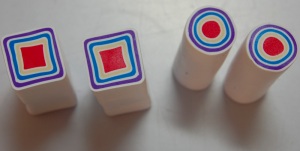
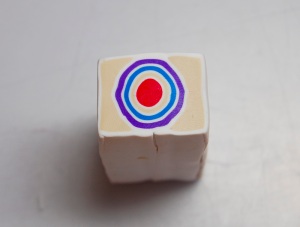
In my last post, I promised to make a cane using a color palette chosen from the COLOURLovers website and a pattern based on a photo of a really cool ‘mod tea set’ I found on Flickr. So, without further ado, here they are:


Since the above pattern has 4 colors and I am using 5, I will modify the design somewhat. I will be using the white clay to outline and separate the other colors.
OK, here we go

1. Here is the clay I mixed to match my chosen color palette. I used Fimo Soft clay in the following proportions: red, 4 parts Cherry Red, 1 part White; beige/ecru, 2 parts Sahara, 1 part White; blue; 1 part Pacific Blue, 1 part Peppermint; purple/violet, 4 parts Plum, 1 part White. The white was used ‘as is’. I mixed the equivalent of 4-6 oz of each color. I would recommend mixing more of the ‘background color’ (in the tea set, this was the dark brown)

2. The next step is to create the center circle and square shapes. I decided to use red for these shapes, and later, for the background as well. Approximate sizes; circle diameter, ½”/13mm, square sides, ½”/13mm

3. Both shapes are outlined with a thin sheet of white clay, (#6 on my Atlas pasta machine)

4. Next, a sheet of beige/ecru at the #3 setting is wrapped around the shapes.

5.Once again, a white sheet at #6 is wrapped around the shapes, followed by a #3 sheet of the blue. As you can see, I am using a thin sheet of the white to separate each color.

6.After another wrapping of white comes a #3 sheet of purple, then white again. The canes are now approximately 2”/5cm in length, and about 1”/2.5cm in width/diameter.

7.The canes are then reduced so each one is approximately 4”/10cm in length, and between 5/8” and ¾” wide (15-18mm)

8. I cut each cane in half, so now I have 4 pieces about 2”/5cm long. I will use only one circle and one square for my cane, and save the other 2 pieces to make another variation of my design later.

9.I will work with the circle cane first. I assemble a solid square shaped block of the beige/ecru clay which will be the same length and width as the circle cane, approximate size 1”x1”sq.x 2” length (2.5×2.5x5cm)

10. The beige square is divided in half to make 2 narrower pieces. These pieces will be used to construct the ‘cut-out rectangle’ shape that surrounds the circle.

11. I cut a wedge off the beige piece approximately the same height as the circle (see left side of photo). Then I use my blade, a small acrylic roller, and an acrylic square rod to shape this piece so the circle cane will fit neatly inside it (see right side).

12. After more trimming and shaping of the beige pieces-make sure to check both ends of the cane-the entire rectangle cane is outlined with an extremely thin sheet of white (# 8 on my Atlas machine).

13. The red clay will be used for the background color. I wrap 2 thick sheets (#1 setting) of red around the cane. I will now work on the square cane shown at the left.

14. I press the square cane against the cane I just made, then I apply 2 #1 thick sheets to the top and bottom. Notice that I did not apply red clay on the right side of the square. Now I have a new rectangular cane.

15. I cut this new cane in half and stack the 2 pieces like this. This newly formed cane is approximately 2”/5cm square and about 1”/2.5cm in length.

16. Here I have reduced the cane to a ½”/13mm square approximately 8”/20cm in length.

17. I decided to reduce a portion of the above cane still further, then cut it into 4 pieces and reassembled it.
Now, that wasn’t too complicated was it ? I still have a circle and square left over (see the 8th photo) to make another version of this cane, but I haven’t decided what color I want to use for the background. However, since I don’t feel like mixing any more clay,
I will save that project for another time when I feel more ambitious !


Hi Dora,
Thank you so much for another wonderful tutorial. I love how you chose your own color palette and then interpreted the marvelous tea set pattern with those colors.
You are inspiring me to make some canes!
By: Karen on May 27, 2009
at 11:39 am
FUN! I love how you get your inspirations from every day things you run across– the tea set, the tiles at your laundromat– makes me look at my everyday world in a new way! Who knows where I may see my next inspiration!
Thank you so much for this great step-by-step on putting together the whole cane. Really helps me see how to fit all the pieces together neatly so it looks good. Wonderful tutorial!
By: intothedawn on May 27, 2009
at 9:06 pm
Glad you enjoyed the tutorial, Dawn ! Now if only I could upload these tutorials as easily as I find ideas for canes, LOL!!! It took me twice as long to get all the photos and captions to display correctly as it did to make the cane and photograph the steps !
By: doras_explorations on May 28, 2009
at 8:21 am
Thanks, Karen ! Color is a fascinating subject, isn’t it? I enjoy reading your blog posts about the process you use to select colors for your beadwork. Selecting bead colors can be especially overwhelming, Aren’t there almost 2000 Delica colors? It’s mind boggling !
By: doras_explorations on May 28, 2009
at 8:15 am
Dora.. another detailed tutorial and great cane result. You amaze and inspire me. Thank you.
By: Judy on June 1, 2009
at 4:45 pm
Thanks Judy! Hope all is well with you !
By: doras_explorations on June 2, 2009
at 7:59 am
Wow! What a process. And I LOVE the result–at every step of the process.
By: Kathleen Scott on June 4, 2009
at 5:42 pm
[…] world. Some people do more pattern and geometric ones than I ever will have a good grip on and this mod square inspired one… Read […]
By: Polymer Clay Mod Squares | It's Handmade on April 19, 2018
at 6:55 pm