One of the main reasons I started a blog was to chronicle through words and photos ‘how I make stuff’. Besides experimenting with form, pattern and color, I am strongly drawn to teaching and to demonstrating polymer clay techniques, specifically caning. I’ve thought, “Wouldn’t it be cool to publish a how-to article in a magazine?”, “I would love to hold classes to teach canework.”, “Imagine actually making money from my art !”, and on and on. What stopped me, of course, was ME ! Every time I thought I came up with a new technique or idea, someone else had already beat me to it. I didn’t have a decent camera to photograph my work, and besides, my photography sucked. I didn’t have the cash to start any kind of ‘business’, and didn’t have the stomach for financial risk-taking. I could devote an entire post (no, an entire BLOG !) to all my insecurities and fears, but it wouldn’t make for very interesting reading.
Well, now I have a decent camera, I know how to post pictures of my work on-line, and I’ve even figured out how to start a blog. No more excuses! Yesterday I decided to make a cane, and take photos of the process. I cleared off a space on my dining room table to use as my film studio. Here’s the result, enjoy ! The photos are a bit small, double click to enlarge.
-

- Here are my tools, just the basics, and the clay colors I plan to use in my cane.
-

- I can never have too much white clay when I make a cane ! The two small canes are leftovers from another project.
-

- I start out by making Skinner blends with the colors I’ve chosen.
-

- These are all the components I will use to assemble the cane. They are all slightly different sizes/heights, but I will trim and reduce the pieces as needed.
-

- Here I’ve reduced some of the components, cut some in half, etc. No particular ‘plan’ in mind, I just want a variety of shapes before I bring them together.
-

- I assemble the various pieces to form a 1 1/2″ square about 2″ high. I filled in some spaces with snakes and sheets of solid colored clay.
-
- I make a diagonal cut in the cane. Now I have 2 right triangle pieces. These I will each cut in half again, and put the two halves together to make mirror images.
-
- I guess I forgot to photograph the part where I cut the two triangles in half to make these mirror images, sorry ! These two pieces will be used to make two kaleidoscope canes.
-

- Here I am reducing one of the mirror image pieces. I usually start by standing the cane face up and pushing against the sides. I frequently turn the cane, and flip it over so it will reduce evenly, and I don’t end up with too much waste on the ends.
-

- When the cane is about 2″ long, I put it on its side and use my roller to reduce it further, making sure to turn it frequently so all the sides get evenly reduced.
-

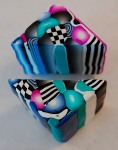
- When I’m done reducing the cane to about 4″ in length, I cut off two slices on the ends, and stand them up on a mirror to see what the cane will look like. Hmmm, not bad..
-

- The reduced ‘mirror image cane’ is cut into four pieces and assembled to make this kaleidoscope cane. It is a 3/4″ square, and is about 3 3/4″ in length.
-

- Ooops, I think I forgot to photograph another step…I took the second ‘mirror image’ square and turned it into an equilateral triangle. Once again, I took pieces off the ends and put them on the mirror to get a preview of how the cane will look.
-

- Here’s the six-sided cane before being reduced. At this point, I could eliminate the sides and reduce it as a circle, but decided to keep it a hexagon, so the slices will fit nicely together like a honeycomb.
-

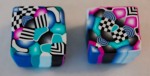
- Here are the two completed canes. The square reduced better than the hexagon, so it’s almost 40% longer. Turning the mirrored square into a triangle caused waste at the ends. Oh well…
-

- The canes are done..wow, that hexagon one is even shorter than I thought, LOL!!! Time to put everything away. I HATE this part !


These are stunning, photographing step by step is harder than producing the canes are they are mega difficult anyway so a big congratulations. Thanks for sharing. Kylee
By: Lunes on July 4, 2008
at 1:34 pm
Thanks, Kylee ! You’re right about the photography, what a job that was ! Yesterday I spend most of the day editing the photos and tweaking them with Photoshop. I hope it will get easier with time, and that my photography skills will improve. It would be so nice to have someone do the photography for me !
By: dorasexplorations on July 4, 2008
at 2:40 pm
Hi Dora,
I am really enjoying your blog. Thank you. Your work is wonderful, keep sharing and inspiring.
JPx
By: joniphippin on July 5, 2008
at 4:20 am
Thanks, Joni, for the compliments ! The best part about blogging is that one gets to meet artists from all over the world. Glad you stopped by !
By: dorasexplorations on July 5, 2008
at 8:00 am
I always find the easiest way to deal with the mess is to do it later! 😉 Love the photos of your process… It is always wonderful to see how other caners work!
By: Cindy Lietz, Polymer Clay Tutor on July 6, 2008
at 7:15 pm
Thanks, Cindy ! Your blog is a fantastic source of information, I’ll be visiting there often !
By: dorasexplorations on July 7, 2008
at 6:52 am
Dora, you did a fantastic demo and your photography was very good. You are really learning a lot about doing a blog. Congratulations!
By: Sandy on July 12, 2008
at 10:02 am
Le ha quedado muy bonita. Me gustaría que siguiera haciendo todas estas fotos de sus trabajos, pues aprendo mucho con usted. ¿Podría hacer paso a paso una caña céltica knot? Me ayudaría muchísimo. Gracias
By: Pilar on July 29, 2008
at 4:16 am
Thank you for your interest, Pilar. The Celtic Knot I learned at the workshop has too many pages of instructions to show. However, I found this Celtic Knot tutorial on the Internet:
http://www.tokensbeads.com/celtic_knot_cane.htm. The instructions are in English (and the measurements in inches, not cm), but there are many photos. Good luck !
By: dorasexplorations on July 29, 2008
at 7:01 am
I sure appreciate you taking the time to let a newbie in on some of your techniques! Love the cane.
By: jojobean2020 on August 16, 2008
at 12:33 am
Thanks, jojobean ! A lot of newbies are very intimidated by caning, but it really isn’t as difficult as it looks. Even if a cane does not end up being perfectly symmetrical, so what? It’s still beautiful. I hope you’ll check in again, as I plan to show more step by step cane constructions.
By: dorasexplorations on August 16, 2008
at 7:11 am
dora- I came across this toot while googling “reducing a hexagon cane” today; so glad I found you, and will be spending some time on your site! This is a lovely cane, btw.
By: Tina on October 20, 2008
at 4:08 pm
muy buena tu pajina me encanto gracias…..
By: victoria angelica on July 17, 2009
at 2:45 pm
Gracias, Victoria !
By: doras_explorations on July 17, 2009
at 3:47 pm
Wow, that is really cool. Thanks for the demo!
By: Julie Gazin on December 22, 2009
at 2:11 pm
Thanks, Julie, i’m glad you liked it ! I hope to get back to doing tutorials very soon, I’ve been busy with other projects this month. Happy Holidays !
By: doras_explorations on December 22, 2009
at 6:34 pm
le quedo lindo todo asi aprendo de usted,que lindo trabaja soy principiante en esto me encanta,haga mas de los paso a paso me encanto esto muchisimo gracias ”dora”que linda es usted
By: victoria angelica on December 22, 2009
at 8:01 pm
señora dora, no se si se puede canes de mariposa, por,favor gracias…….
By: victoria angelica on December 23, 2009
at 12:17 am
[…] Follow this link over to Dora’s Explorations for a great tutorial on putting together Kaleidoscope Canes. […]
By: Tonja's Polyclay Corner » Blog Archive » Dora’s Tutorial – Building a Kaleidoscope Cane on May 18, 2010
at 1:46 pm
thanks for linking to my tutorial !
By: doras_explorations on May 18, 2010
at 1:57 pm
tus trabajos son bellos me encantan esos canes….bellisimos victoria de usa..
By: victoria angelica on May 18, 2010
at 3:13 pm
I just found your site and love it. too bad you don’t post anymore a huge loss.
Merrie
By: merrie on January 29, 2011
at 7:43 am
Merrie, I’m so glad you enjoyed the site. It has indeed been a long time since I added a tutorial…Just haven’t had the time or energy required to put one together. Thanks for reminding me that people do stop and visit ! Certainly I appreciate it, and hopefully it will motivate me to carve out a block of time to do one of the things I enjoy most-working with clay and demonstrating techniques !
By: doras_explorations on January 29, 2011
at 8:00 am
Hi Dora,
I just wanted to say thank you for being so kind to post info for all to learn and enjoy.
Kelly
By: Kelly on June 13, 2011
at 8:59 pm
I’m glad you enjoyed the post, Kelly !
By: doras_explorations on June 14, 2011
at 8:08 am
hi Dora
thanks so very much for this beautiful tutorial!! the photography is wonderful and so are your color choices!
i agree, with Merrie, too bad there are no more lovely tutes from you any more. but i do understand, and will stop by every so often to see if there’s anything new.
thanks a lot
Suzanne
By: suzanne on December 15, 2011
at 2:15 pm
Thanks, Suzanne, for the kind words. The last few years have brought various difficulties that have interefered with my producing tutorials, and doing other art-related things. I hope to get back to doing tutorials again, and maybe even realize my dream of teaching polymer clay classes, in the not too distant future. Meanwhile, it is nice that people still visit my blog, it serves to remind me what I’m capable of doing !
By: doras_explorations on December 15, 2011
at 2:31 pm
[…] https://dorasexplorations.wordpress.com/2008/07/03/building-a-cane-from-start-to-finish/ […]
By: Урок. Техника калейдоскоп. - Блог о творчестве и рукоделии. on September 18, 2013
at 9:01 am